
How to Draw Realistic Fur: A Step-by-Step Guide For Beginners
- Ronda Kris
- Oct 26, 2024
- 4 min read
Creating realistic fur is a skill that adds remarkable detail and life to your artwork, whether you’re drawing pets, wild animals, or even fantasy creatures. This detailed guide will break down each step, providing tips and techniques to capture the essence of real fur and bring depth, texture, and lifelike quality to your work. Ready to learn how to draw fur that looks like you could reach out and touch it? Let's go!
1. Study Fur Texture and Direction
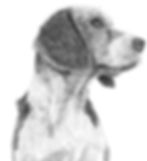
Before drawing, take a few moments to study the animal’s unique fur texture and growth patterns. Different areas, like the face, legs, neck, and tail, often have varying fur lengths and thicknesses. High-quality reference photos are essential for noticing these differences and understanding how light interacts with fur across the body.
It can also be helpful to create a simple “fur direction map” to guide your strokes in the natural flow of the fur. This map lays a foundation for realistic, cohesive fur that follows the contours of the animal's body, bringing depth and life to your drawing.
2. Choose the Right Tools
Choosing the right pencils and paper is key to achieving realistic fur textures. Use a variety of graphite pencil grades: softer pencils like 4B or 6B are great for deep shading and darker tones, while harder pencils (H or 2H) add lighter, fine details for contrast. Colored pencils also help with layering and adding depth to fur colors. Medium-tooth paper works well, offering enough texture to grip layers without smudging, enhancing the fur’s dimension.
Experimenting with different pencil grades and paper types will help you find the best combination for your unique style and for creating lifelike fur effects, whether short or fluffy. Keywords like “best pencils for fur drawing,” “medium-tooth paper texture,” and “layering techniques for realistic fur” can be helpful as you refine your approach.

3. Start with Light Strokes to Build Layers
To create realistic fur, begin with light, delicate strokes that follow the natural direction of the fur’s growth. Fur generally consists of multiple layers: the dense undercoat, which provides bulk, and the longer, more visible top layer that gives shape and detail. Start by sketching the undercoat with short, gentle strokes to capture the softer, thicker foundation. Work gradually, layering strokes to mimic the natural buildup of fur.
For thicker or textured areas, experiment by varying the length and pressure of your strokes to achieve an organic, fuller look. This variation keeps the fur from looking uniform or flat, enhancing depth and creating the illusion of realistic fur. Adding layers not only provides texture but also enables you to emphasize shadows and highlights, which are essential for a lifelike effect. Each layer contributes to the depth, making the fur appear more natural and dimensional.
4. Create Depth with Shadows and Highlights
To draw fur that looks realistic, pay close attention to how it reacts to light, incorporating shadows and highlights to add depth and dimension. Start by determining the primary light source in your reference photo, then carefully note where shadows fall and how they shape the fur’s texture. For areas that require darker shading, choose softer pencils (such as 4B or 6B) and apply more pressure to create depth, or layer in additional graphite to enhance these shadowed sections. For highlights, lift graphite carefully with a kneaded eraser or add lighter tones using a white pencil to softly contrast against darker sections. Maintain a balanced contrast between light and shadow, as over-darkening can flatten your drawing; subtle transitions help achieve a realistic, three-dimensional appearance in fur.

5. Use Short, Varied Strokes to Capture Texture
To capture the natural look of fur, steer clear of using long, uniform strokes. Real fur has an irregular, somewhat messy appearance, so use short, varied strokes to mimic this texture. Vary the length, direction, and pressure of each stroke to give an organic feel. Pay close attention to the way fur wraps around the animal’s body contours, adjusting your strokes to follow these curves and add dimension. This method is especially effective in areas where fur direction changes, like around the ears or face, creating distinct patterns that make your drawing more realistic.
6. Create Realistic Fur Patterns and Colors
Including realistic fur patterns, such as stripes, spots, or patches, gives your drawing added authenticity and detail. Start with light, controlled strokes in the patterned areas, layering softly to establish a natural base without overpowering the texture. Gradually add color and depth, focusing on how these patterns blend seamlessly with the existing fur texture. This technique ensures that the patterns look naturally integrated rather than sitting on top of the fur.
For animals with multi-colored or patterned fur, layering is key. Slowly build each color with soft transitions between shades to avoid a flat, artificial look. Work with multiple layers of color to create smooth, gradual transitions that mimic the natural blending of fur. Pay close attention to how light interacts with each color in your reference, as highlights and shadows play a critical role in achieving a lifelike depth. This approach enhances realism, making the fur appear textured and vibrant across different sections.

7. Refine and Blend for a Finished Look
Once the main layers of fur are established, focus on refining the smaller details to bring your drawing to life. Use a blending stump or soft tissue to gently smooth areas where fur transitions, taking care not to over-blend, as a bit of texture is essential for realism. Add finishing touches by enhancing highlights and deepening shadows to create contrast, which makes the fur appear more three-dimensional. For stray hairs and edges requiring sharp definition, use a fine-tipped pencil with a light touch to create crisp, clean lines. This final stage gives polish and cohesion, elevating the lifelike quality of your drawing and tying the details together seamlessly.
Practice and Patience Are Key
You may be wondering, “How can I get better at drawing realistic fur?” Creating lifelike fur requires patience and practice. Study real fur and reference images to understand textures and shading. Each fur type needs slight technique adjustments, which will feel natural with practice.
With time, you’ll confidently create lifelike fur that adds depth to your art. Keep experimenting, and enjoy the journey!